example - building a robot
In this example, we are going to create interactively a instance of a Robotic Arm, that is based on the "Robotic" companion specification.
If you haven't explored the "Robotic" Companion specification, I strongly encourage you to have a look at it so we understand how a Robotic device can be modelize and how semantic informations can be added to the model.
MotionDeviceSystem
As we read the Robotic companion spec, we understand that a Robotique system is in fact described
in a Object of type "MotionDeviceSystemType".
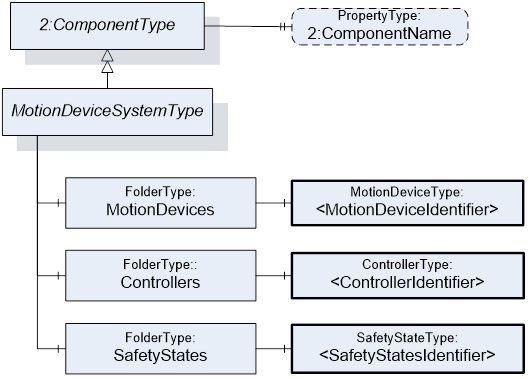
A MotionDeviceSystemType can have one or more independant Motion Devices.
It can also have Controllers and SafetyStates.
The Motion Devices will have to be inserted inside the MotionDevices folder of the MotionDeviceSystem.
This is quite interesting as it allows us to design complex robotics setup made of multiple robotics arms or robotics arms combined with other articulated equipment such as robotized Linear rails or rotary tables.
In our case, we will need to create a MotionDeviceSystem that only contain a single robotic 6 axis arm.
MotionDevice
Let's now focus now on the MotionDeviceType.
You can explore the online documenation of this ObjectType in https://reference.opcfoundation.org/Robotics/v100/docs/7.2.

A MotionDeviceType derives from ComponentType defined in the Device Integration namespace (di).
It contains a collection of axes stored in the Axes folder as well as a collection of power train subsystems stored in the PowerTrains folder. At least one Axis and one PowerTrain are mandatory,
It as a optional Folder named AdditionalComponents that can be used to store addition subsystems that may be required.
As a ComponentType, a MotionDeviceType exposes the property that are defined in the base type and that will be useful to expose information about the Manufacturer , the SerialNumber , the ProductCode etc
Let's go !
let create a file with this initial file named "robot.model.yml"
# yaml-language-server: $schema=https://support.sterfive.com/nodeset2.schema.json
namespaceUri: http://sterfive.com/UA/MyRobot/
version: 1.0.0
publicationDate: 2019-01-01T12:00:00Z
Let now start the opcua-modeler in watch mode with the --serverso we can immediatly see the result of our model appearing in a live demo OPCUA server.
$ opcua-modeler generate -i robot.model.yml --watch --server
You can open the _generated_demoRobot.Nodeset2.xml file
click here to see _generated_demoRobot.Nodeset2.xml
<?xml version="1.0"?>
<UANodeSet xmlns:xsi="http://www.w3.org/2001/XMLSchema-instance" xmlns:uax="http://opcfoundation.org/UA/2008/02/Types.xsd" xmlns="http://opcfoundation.org/UA/2011/03/UANodeSet.xsd" xmlns:ns1="http://sterfive.com/UA/MyRobot/Type.xsd">
    <NamespaceUris>
        <Uri>http://sterfive.com/UA/MyRobot/</Uri>
    </NamespaceUris>
    <Models>
        <Model ModelUri="http://sterfive.com/UA/MyRobot/" Version="0.0.0" PublicationDate="1900-01-01T00:00:00.000Z">
            <RequiredModel ModelUri="http://opcfoundation.org/UA/" Version="1.05.01" PublicationDate="2022-02-24T00:00:00.000Z"/>
        </Model>
    </Models>
    <Aliases/>
<!--ReferenceTypes-->
<!--ObjectTypes-->
<!--VariableTypes-->
<!--Other Nodes-->
</UANodeSet>
We need to import the companion namespaces that our model is relying on.
The standard OPCUA Namespace (namespace=0) is always included and do not need to be specifically added.
We need to install the http://opcfoundation.org/UA/Robotics/ namespace.
Because, the robotic namespace relies on the Device Integration namespace, we will need to install the http://opcfoundation.org/UA/DI/ beforehand.
opcua-modeler already have in stock a list of the most common companion specification.
| namespace Uri | alias |
|---|---|
http://opcfoundation.org/UA/ | ua |
http://opcfoundation.org/UA/DI/ | di |
http://opcfoundation.org/UA/IA/ | ia |
http://opcfoundation.org/UA/AutoID/ | autoId |
http://opcfoundation.org/UA/CNC | cnc |
http://opcfoundation.org/UA/Machinery/ | machinery |
http://opcfoundation.org/UA/Robotics/ | robotics |
http://opcfoundation.org/UA/MachineVision | machineVision |
http://opcfoundation.org/UA/PackML/ | packML |
http://opcfoundation.org/UA/MachineTool/ | machineTool |
the full table is available at the namespace alias table
To make it easy, we can simply use the "alias" to refer to the corresponding namespace.
We will see later on that the alias is quite convenient to build-up browse name and browse path, without worrying about namespace indexes that are usually hardly predictable.
We have chosen to replace namespace indexes with more readiable in which namepsace context a broxwse name is refering to.
So inserting a reference to the robotics and di is done straigforwardly by populating the namespaces: array in the yaml file with the corresponding aliases. Make sure you add di before robotics.
namespaces:
  - di
  - robotics
It is now time to create our RoboticSystemType object type by deriving from the MotionDeviceSystemType defined in robotic namespace:
objectTypes:
  - browseName: MyRoboticSystemType
    subtypeOf: robotics:MotionDeviceSystemType
Your YAML file should now look like this
# yaml-language-server: $schema=https://support.sterfive.com/nodeset2.schema.json
namespaceUri: http://sterfive.com/UA/MyRobot/
version: 1.0.0
publicationDate: 2023-01-01T12:00:00Z
namespaces:
  - di
  - robotics
objectTypes:
  - browseName: MyRoboticSystemType
    subtypeOf: robotics:MotionDeviceSystemType
and the generated NodeSet2.Xml File should look like this
<?xml version="1.0"?>
<UANodeSet xmlns:xsi="http://www.w3.org/2001/XMLSchema-instance" xmlns:uax="http://opcfoundation.org/UA/2008/02/Types.xsd" xmlns="http://opcfoundation.org/UA/2011/03/UANodeSet.xsd" xmlns:ns2="http://opcfoundation.org/UA/DI/Type.xsd" xmlns:ns3="http://opcfoundation.org/UA/Robotics/Type.xsd" xmlns:ns1="http://sterfive.com/UA/MyRobot/Type.xsd">
    <NamespaceUris>
        <Uri>http://sterfive.com/UA/MyRobot/</Uri>
        <Uri>http://opcfoundation.org/UA/DI/</Uri>
        <Uri>http://opcfoundation.org/UA/Robotics/</Uri>
    </NamespaceUris>
    <Models>
        <Model ModelUri="http://sterfive.com/UA/MyRobot/" Version="0.0.0" PublicationDate="1900-01-01T00:00:00.000Z">
            <RequiredModel ModelUri="http://opcfoundation.org/UA/" Version="1.05.01" PublicationDate="2022-02-24T00:00:00.000Z"/>
            <RequiredModel ModelUri="http://opcfoundation.org/UA/DI/" Version="1.03.1" PublicationDate="2021-09-07T00:00:00.000Z"/>
            <RequiredModel ModelUri="http://opcfoundation.org/UA/Robotics/" Version="1.01.2" PublicationDate="2021-05-20T00:00:00.000Z"/>
        </Model>
    </Models>
    <Aliases>
        <Alias Alias="HasSubtype">i=45</Alias>
    </Aliases>
<!--ReferenceTypes-->
<!--ObjectTypes-->
<!--ObjectType - 1:MyRoboticSystemType {{{{ -->
    <UAObjectType NodeId="ns=1;i=1000" BrowseName="1:MyRoboticSystemType">
        <DisplayName>MyRoboticSystemType</DisplayName>
        <References>
            <Reference ReferenceType="HasSubtype" IsForward="false">ns=3;i=1002</Reference>
        </References>
    </UAObjectType>
<!--ObjectType - 1:MyRoboticSystemType }}}}-->
<!--VariableTypes-->
<!--Other Nodes-->
</UANodeSet>
Now, if you explore the generate md file, you should see appearing the documentation of our model. THe opcua-modeler has generated for us the class diagram using the OPCUA convention.

instantiating Robot1 inside the MotionDeviceSystem
we cannot now add a MotionDevive instance inside
the MotionDevices folder of the MyRoboticSystemType instance.
Note: do not forget to prefix the MotionDevices browseName with the
alias of the corresponding namespace. Here we need to specify that the
MotionDevices browseName belongs to the robotics namespace : robotics:MotionDevice.
namespaceUri: http://sterfive.com/UA/MyRobot/
version: 1.0.0
publicationDate: 2023-01-01T12:00:00Z
namespaces:
  - di
  - robotics
objectTypes:
  - browseName: MyRoboticSystemType
    subtypeOf: robotics:MotionDeviceSystemType
    components:
       - browseName: robotics:MotionDevices
         components:
          - browseName: Robot1
            typeDefinition: robotics:MotionDeviceType
We can continue, by starting adding the Axe (Axis1, Axis2, Axis3 etc ... ) of our robot.
objectTypes:
  - browseName: MyRoboticSystemType
    subtypeOf: robotics:MotionDeviceSystemType
    components:
       - browseName: robotics:MotionDevices
         components:
          - browseName: Robot1
            typeDefinition: robotics:MotionDeviceType
            components:
              - browseName: robotics:Axes
                components:
                  - browseName: Axis1
                    typeDefinition: robotics:Axis
                    componentOf: MyRoboticSystemType/robotics:Axes
We may want to expose the flangeLoad variable. This variable is marked with a Optional Modeling rule on the MotionDeviceType.
Therefore we need to specify that we want to instantate this otptional variable by adding it to the optionals collection of the
component instance definition in the yaml file:
  - browseName: Robot1
    typeDefinition: robotics:MotionDeviceType
    organizedBy: /ua:Objects/di:DeviceSet
    optionals:
      - robotics:FlangeLoad
In the same way, we need to definE the PowerTrain;
objectTypes:
  - browseName: MyRoboticSystemType
    subtypeOf: robotics:MotionDeviceSystemType
    components:
       - browseName: robotics:MotionDevices
       - browseName: robotics:PowerTrains
         components:
           - browseName: PowerTrain1
           - typeDefinition: robotics:PowerTrainType


 then the motors inside  the power Trains

```yaml
objectTypes:
  - browseName: MyRoboticSystemType
    subtypeOf: robotics:MotionDeviceSystemType
    components:
       - browseName: robotics:MotionDevices
       - browseName: robotics:PowerTrains
         components:
           - browseName: PowerTrain1
           - typeDefinition: robotics:PowerTrainType
           components:
             - browseName: Motor1
               typeDefinition: robotics:MotorType
and the associated gear boxes
      components:
        - browseName: Motor1
          typeDefinition: robotics:MotorType
        - browseName: Gear1
          typeDefinition: robotics:GearType
specifying optional properties and components
If you want to enrich one instance by exposing one of the optional properties or components defined in its type,
you can specify this using the optionals yaml entry in the instance definition.
Each entry must be a fully qualified path: every segment is prefixed with the
namespace alias of the namespace that declares it. The own-namespace alias may
be omitted but every foreign segment (di:, robotics:, …) is required.
See VariableTypes / the optionals list
for the full set of rules.
Here is how you expose the optional ActualSpeed and ActualAcceleration OPC UA Variables
on an Axis instance. Both variables are declared inside the ParameterSet
(itself defined in the di namespace) of robotics:AxisType, so the path
spans two namespaces:
  - browseName: AxisA
    typeDefinition: robotics:AxisType
    optionals:
      - di:ParameterSet.robotics:ActualSpeed
      - di:ParameterSet.robotics:ActualAcceleration
adding additional Semantic links between the OPCUA nodes
The Robotics Companion provide a Move referenceType that can be use
to link a power train with the axis that it put in motion.
Similarly, the HasSlave referenceType provides the relationship of power trains which provide torque for a common axis.
Adding additional references is relatively straightfoward.
references:
  - referenceType: robotics:Moves
    source: PowerTrain1
    target: Axis1

  - referenceType: robotics:HasSlave
    source: PowerTrainA
    target: PowerTrainC

  - referenceType: robotics:Moves
    source: PowerTrainB
    target: AxisB
  - referenceType: robotics:HasSlave
    source: PowerTrainB
    target: PowerTrainC

  - referenceType: robotics:Moves
    source: PowerTrainC
    target: AxisC
  - referenceType: robotics:HasSlave
    source: PowerTrainC
    target: PowerTrainD

  - referenceType: robotics:Moves
    source: PowerTrainD
    target: AxisD
Initializing variables
initializers:
  - variable: Robot1/di:Manufacturer
    value: Sterfive Fake Robot
  - variable: Robot1/di:ProductCode
    value: Sterfive Fake Robot
  - variable: Robot1/di:SerialNumber
    value: SN12345
  - variable: Robot1/robotics:FlangeLoad/robotics:Mass
    value: 1000
    engineeringUnits: kg